

What is a Shrinking Header?
A shrinking header in website design refers to an element where the top section of a webpage, containing logos, navigation menus, and other key elements, diminishes in size as users scroll down. This effect aims to enhance the user experience, providing a streamlined and aesthetically pleasing interface.
The primary goal of a shrinking header is to maximize screen space for the main content as users scroll, ensuring easy access to essential navigation elements. As users scroll, the header may reduce in size, either fixing itself at the page's top or transforming into a more compact version. This design maintains cleanliness and unobtrusiveness, preventing the header from dominating the space and allowing users to concentrate on the content.
Web designers and developers employ various techniques, such as JavaScript and CSS, to implement shrinking headers. The specific approach depends on the website's design and the desired user experience.
What are the Benefits Of a Shrinking Header on Scroll?
The primary advantage of a shrinking header is the increased space it allocates to your main content. This design choice also enhances the prominence of your main content by eliminating the competition with your site's full header for a visitor's attention.
At the same time, though, you’re still able to give users access to your full navigation menu at all times, which you wouldn’t be able to do if you completely hide the header when a user scrolls down.
In essence, this approach allows you to enjoy the benefits of both worlds: an expanded area for your content and the ability to present your full navigation menu seamlessly.
How to Create an Elementor Shrinking Header?
Ready to customize your header using Elementor Theme Builder? Follow these simple steps:
Step-1: Login to your WordPress dashboard and go to Templates > saved templates. Find your header and click Edit with Elementor.


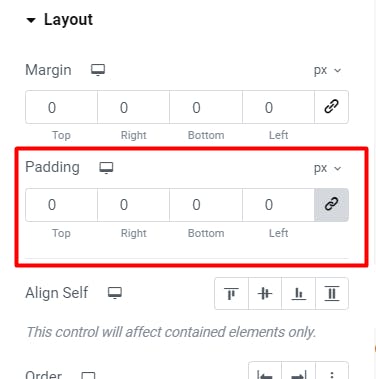
Step-2: Select your header section and the padding will be 0px.
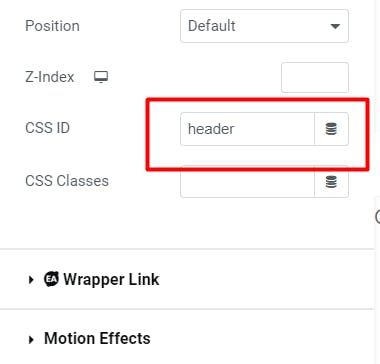
Then you need to add the ID "header" in the header section.
Select the Logo Widget and add the class "logo" for logo widget.

Step-3: In this step, you need to add some custom code for your header. So you go to the WordPress dashboard and select Appearance > Customize > Additional CSS
Add this code:
#header{
    transition: all 0.5s ease;
    padding: 20px 10px;
}

#header.elementor-sticky--effects{
    padding: 10px;
}
Optional: If you want to decrease your logo to scroll then add this code:
.logo img.attachment-full.size-full{
    transition: all 0.5s ease;
}

#header.elementor-sticky--effects .logo img.attachment-full.size-full {
    width: 85% !important;
}
Note: you can place the logo weight as you wish
Optional: If you want to change your navbar menu font size while scrolling, add this CSS code:
#header.elementor-sticky--effects a.elementor-item.menu-link{
    font-size: 14px;
}
If you have any more questions to the Elementor shrink header you can comment.
My website: https://dev-shahinsr.pantheonsite.io/
Best Regards,
Shahin